Now please keep in mind that I am not a professional photographer and if Annie Liebowitz saw these tips her eyes would start bleeding.
First I want to talk a little about lighting.
I am not a big fan of a flash. I prefer to take photos in natural light because I feel like a flash gives everything an odd, flat feel to it.
My favorite time to take pictures is late afternoon into evening. I just love the shadows cast by the angle of the sun at that time. But morning works just as well.
So, the first step is to take your camera off the automatic setting and put it on manual. I know it's scary, but you can do it! It's important that you are able to change the settings easily between pictures to get a good result each time. Your camera is smart, but you are smarter!
Your camera will have an ISO setting. You should change this depending on the lighting conditions. In the sunlight it's best to have a low ISO setting, I like to set mine at 80. As the light fades, you will need to set the ISO higher. It depends on how high the ISO on your camera goes as to what ISO you use.
I'm sure your asking "But if I can shoot in any light with a high ISO why not keep it high all the time?" The answer is noise. The higher the ISO the more "noise" you get in your shot. You will notice that the colors and edges are just not as crisp and you will have more pixellation.
The next setting that you will want to play around with is your shutter speed. The shutter controls how much light reaches the lens. The faster the shutter speed, the less light gets in. A fast shutter speed works better in good light and is necessary for a moving subject. A low shutter speed will help you get more light when it is darker out, but will not do well with moving objects.
The final step in photography is PhotoShop. Every photographer should have it installed to play around with the photos in post production.
Here are a few more tips:
1. Shoot like there is no tomorrow. With digital cameras there is no charge for a crappy shot.
2. Shoot manually.
3. Shoot from all angles to see what you get.
4. Mess around with your camera so you get comfortable with the settings. This will help you later with cool extras.
Okay, now for some examples.
First: Light.
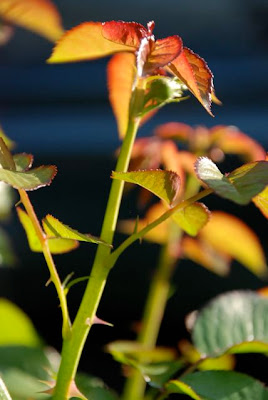
This photo was taken at about 6pm. The light at this time of day is what allowed me to get the "glowing" look to the rose bush.

If I had taken this photo at a different time of day I would have gotten a totally different result.
Another light comparison.
These photos were taken mid-day when the light was strong. In the first photo you can see that my shutter speed was too low. (I know it was a shutter speed problem because in this light my camera would have been set at an 80 ISO).

You see how the flower has very little detail? That's because there is too much light coming back into the lens. I adjusted my shutter speed so it was faster and the result was:

A lovely flower with details and shadows.
Second: Flash.
As I said, I'm not a fan of a flash. Here's an example of a picture of a tulip taken with a flash:

It looks kinda psychadellic, but not at all in keeping with the natural look that I prefer.
Here's a better shot of a tulip in natural light:
You can get a much better sense of the flower without the flash because all of the natural shadowing is in place. It looks much more 3 dimensional.
You can see from these examples that I absolutely do not get a perfect shot each time. I take a shot, look at the result in the screen, and adjust my settings to get what I want.
The more you play around with it the better your photographs will be and the more fun you will have.
Next time I will talk about getting a good focus point in your shot and I will explain a little about postproduction.
Thanks for all the compliments and Happy Shooting!


 meghaninwonderland@gmail.com

0 comments to blog for:
Post a Comment